Tuesday 24 December 2013

how I use own domain on blogger?


name for my blog?

Blogger offers two publishing options for your blog: hosting on Blogspot (example.blogspot.com) and hosting on your own custom domain (www.example.com or foo.example.com). You can change your publishing option at anytime, and your content will always remain unaltered regardless of which of these options you choose.
Before you move your blog to a custom domain, you need to have already purchased a custom domain (www.example.com) from another provider, as you can no longer purchase custom domains through Blogger. There are many companies from whom you can buy domain names, usually for very reasonable yearly prices. A Google search for "domain registrar" will turn up numerous options. Here's a quick list:
If your content is in a different language and you'd like to purchase a country-specific domain, you can do a search for local registrars. For example, if your blog is in French and you'd like a www.example.fr domain, then you should look for "Domain registrar in France."
Read more ...

how to get free unhosted adsense account?


Use my hosted AdSense account to show ads on my own site

How to upgrade YouTube, Blogger or other hosted account to show ads on a website

If you signed up for AdSense through ahost partner and you’d like to show ads on your own non-host partner website, then you’ll need to provide us with the URL of the site you want to monetize. You can do this via a one-time application form. Here’s how:
  1. Click the gear icon in the upper right corner of any tab, then, from the drop-down list, selectSettings.
  2. In the sidebar, click Access and authorization. In the “Site authorization” section, next to "Only host sites are allowed to show ads for your account," clickedit.
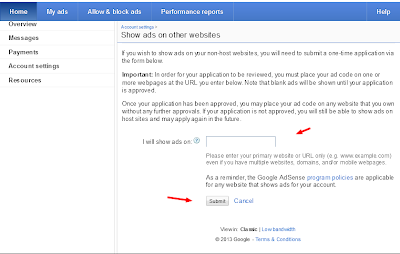
  3. On the “Show ads on other websites” page that appears, enter the URL of the site where you plan to show ads.
  4. Click Submit.
  5. Finally you need to implement AdSense ad code on the URL that you provided above, on a page that receives traffic.
    To implement AdSense ad code, you first need to generate the ad code. You can learn how to implement it on your non-host partner website by following ourcode implementation guide. Note that your ad units will remain blank until your request has been approved.
Once your request is approved, you’re welcome to place your ad code on any website that you own without any further approvals. If your application is not approved, be assured that ad serving on your host partner site will not be affected. You can continue to monetize your hosted content as normal.
Read more ...

TT Facebook likebox details

TT Facebook LikeBox is module which helps facebook fanpage owner to add Facebook LikeBox to their own site to attract and gain likes. This Facebook likebox module enables user to See how many users like fanpage,Shows recent posts from the fanpage and Like Page with one click only without visiting the page.
This Module is simple to install and has various options to customize LikeBox
Features
  • Show or hide header 'Find Us on Facebook' for Likebox
  • Show or hide profile pictures of people like fan page.
  • Show or hide facebook fanpage stream.
  • Customize width and Height of Like box.
  • Select color scheme between Lite and Dark.
  • Choose rendering --- iframe, HTML 5, XFBML.
  • Customize border color of Like box.
  • Customize background color of Like box.
  • Choose language for Likebox from 100+ languages.
Version 1.1 changelog
  • Available for Joomla 3 sites
  • Availability of Show or Hide border option
  • Feedback for this module is valuable for us.Send us your feedback and suggestions to improve this module at goyalprimal2@gmail.com
    Download
    TT Facebook Likebox for Joomla 1.5 Download.
    Click here.
    TT Facebook Likebox for Joomla 1.6,1.7 & 2.5 Download.
    Click here.
    TT Facebook Likebox for Joomla 3 Download.
    Click here.
Read more ...

Sunday 22 December 2013

How to write article quickly?

image of timer
I don’t really want to spend more than 20 minutes a day on writing articles. And I spent no more than 20 minutes to write this article.
I realize this is writing blasphemy. Internet marketing is powered by content, and content is king. But when I have a daily schedule to post on and a business to run, I don’t have time to spend hours polishing every single blog post or writing 2,000-word articles.
Writing quickly doesn’t mean compromising on writing well, though. I’ve got seven tips to get you in and out of that composition box in twenty minutes – without sacrificing quality.

1. Keep an idea list.

When inspiration for a post strikes, scribble it down in a notebook or a word file. For many bloggers and content creators, finding the topic to write about takes up half the time. Keeping an idea list lets you leap in to a new post quickly when you’re ready to write.

2. Let your ideas incubate.

If you try to force yourself to come up with supporting information for your brilliant idea right away, it’s going to take ages. Let that topic sit for a few days, though, and you can add new ideas as they occurs to you – and when you’re ready to write, you’ll already have all the supporting info you need.

3. Edit before you start

You’ve probably got twice as many ideas as you need at this point, so it’s time to be brutal. Cut out any supporting idea that doesn’t fit with the main topic of the article. Remember, we’re talking about how to write an article in 20 minutes, not an epic. You can always use the ideas you don’t need for later posts.

4. Use bullet points

Bullet points, or numbered points like “10 Ways to Get More Subscribers”, can make writing an article a lot simpler in terms of organization because you no longer have to figure out transitions from one idea to the next. The great side benefit is that readers like lists; they’re easier for the eye to follow.

5. Keep it short

If you want to finish that article in 20 minutes, try to keep it under 500 words. Don’t feel like you’re skimping on quality content, either: this article is only about 500 words but it’s chockfull of information. Make every word count and you’ll save time without letting quality slip.

6. Come back later

If you find that you’re stuck, don’t try to force the words to come. Save the article and work on something else for awhile. If inspiration strikes, open up that document again. You can even switch from one blog post to another, spending a few minutes on each as ideas comes to you. It’s a huge time-saver.

7. Never save a good idea

It’s tempting, when you look through your list of ideas, to save the best ones for later because you think they’ll be easier to write. You don’t want to save time later, you want to save time now. Do the articles you know will come easily and make the most of that time.
Follow these simple steps and you’ll be on your way to brilliant articles in a fraction of the time. Share some of your favorite article writing tips in the comments!
About the Author: Jim Estill is the CEO of Canadian computer product company SYNNEX and the author of the Time Leadership blog and book 

Smarter is BetterSolutions for Smarter Content Marketing

Here’s what we’ve got for you:
  • 15 high-impact ebooks on content marketing, SEO, email marketing, landing pages, keyword research, and more.
  • A 20-part Internet marketing course that lays out a comprehensive path for your own online strategy.
  • An organized reference guide to the “best of the best” of Copyblogger.com, and how it all profitably fits togethe
Read more ...

GOOGLE PIN NOT RECIEVED? HOW TO DO NEXT TO IT?

Adsense is undoutdely a life line for every blogger.So many bloggers are there who depends upon it for earning.However before paying,Google verifies your address by sending a verification Pin which contains 4 digit Pin.
dekh Google Adsense Pin not received What to do next?
Google does so to ensure that the payment always goes to the real person.It is an usual process however what to do if you haven’t received the Google Adsense Pin?.Actually,today i am answering the question which was asked by “Gautam Mandal” of India.His question is “Dear sir.I have got the approval of adsense and my adsense income has crossed 10$.As a result they have sent a verification Pin but i haven’t received it yet.So what should i do now?“.Well Gautam,the answer is provided below:
You Might Also Like -Why you should Avoid Purchasing Google Adsense Account
What is Adsense Pin and Why does they send it?
 Google Adsense Pin not received What to do next?
As written earlier,Adsense PIN is highly confidential secured number sent by Google Adsense to its publisher.They send it either through Bluedart courier service or through Postal service.They does so to confirm your identity.They don’t want to send payment to anybody so as i guess,it is necessary as well.
Recommended Article for You – What Kind of Contents are supported by Google Adsense Terms?
How much Time does an Adsense Pin take to reach?
 Google Adsense Pin not received What to do next?
Normally,Adsense doesn’t take much time but in asian and other small country,it takes more than 50% time as specified.It is quite logical as well so if you are an asian Publisher then it will definitely take more than even a month.Most of the people says that they got it after 41 days or so.
Normally Adsense sends Pin after 5 days when it appears on your dashboard.If you live in USA,UK or any western countries then it will take approx 21 days.However for asian publisher,it will take more than 40 days.
Google Adsense Allows you to apply three times for PIN.It means if it failed to reach you in firts attempt,you can request them two times more.
Recommended Article for You - EALP Forums: Best Option for College Students to earn Money Online
Google Adsense Pin not received-What to do next?
Sometimes,it happens.Users doesn’t get their verfication PIN even after requesting thrice.If you are also among them then don’t worry at all because Google will send you a Mail with two methods to remove the PIN number restriction.
  • Method 1 - Send the Digital Image of your I.D card or any other document like your Bank statement,driving license etc which contains your Address.Make sure that the document contains the same address which is mentioned in your Adsense Account
  • Method 2 -Recheck yoyur Mailing Address again.If it is wrong then correct it and inform Google about it so that they can send it again via standard air mail.
Recommended Article-Is It really tough to get an Approved Adsense Account in India?
Why are you Tensed Now?
Don’t get Tensed.If you have already completed three requests for verification PIN but haven’t received it yet then wait for the EMail from Google Adsense.Once it appears in your inbox,send  Digital Image of your ID Card,Bank statement or any other document which contains your Address.Make sure that the address in sent document and your adsense account is same.If your document contains language other than English then translate it via Public Service Notary.
Recommended Article -YAHOO! BING Contextual ADS Program: Best Google Adsense Alternative
From the Editor’s Desk
Through my Post “Google Adsense Pin not received-What to do next?”, I tried my level best to clarify the confusion of Gautam Mandal and many other new adsense publishers who are waiting to receive their Google Adsense verification Pin.
If you still have any query in your mind then feel free to ask me through comments.It would be a pleasure for me to answer your questions.
Read more ...

HOW TO USE ADSENSE ACCOUNT FOR DISPLAYING ADS ON YOUR WEBSITE OR BLOG?

  • Login to your Adsense Account
  • Click on “Account Settings” option on Home Page. The screenshot of the same is given below:
52 How to get an Approved Adsense Account in 1 hour?
  • Move to “Access and Authorization” section. You will find this section at the end of “Account Settings” Page.
  • Click on “Edit” link which appears next to “Only host sites are allowed to show ads for your account” option.
  • Now, Add the url of your website(where you want to show Ads) on “Show Ads on Other Website” Page. You have done most of your work.
  • Finally, Create an Ad Unit and implement the code in your website.. Enjoy.
  • If you want to display Adsense Ads on Blogger Blog, Simply Associate your Adsense Account with blogger.
Read more ...

HOW TO GET ADSENSE ACCOUNT ON YOUTUBE?

I am not publishing much articles these days because I am busy in designing templates and completing the requests of my clients. Today, I have got some relief and thus publishing an important article about getting anApproved Adsense Account in 1 hour. I was getting several request, Where user asked me to provide some easiest method for getting an Approved Adsense Account.
Google Adsense Approval How to get an Approved Adsense Account in 1 hour?
Image Creditweb Matser Facts
Google Adsense is undoubtedly one of the best Ad network for bloggers and Web Masters but getting an approved adsense account was never an easy procedure. However, those days are passed and now, You can get an Approved Adsense Account in 1 hour. Isn’t that unbelievable? But it is true. In this post, I will show you “How to get an Approved Adsense Account in 1 hours?
You Might Also LikeHow to sell Ad spaces in Low Traffic Blogs?
How to get an Approved Adsense Account in 1 hour?
You can get an Approved Adsense Account in 1 hours through the help of YouTube Monetization method. The whole procedure is shown below:
  • First of all, Create a New GMail Account.  If you haven’t used your Old GMail account for Monetization then you can also use your Old account as well. If your country is not supported by Adsense then choose a country like US and UK, while creating New GMail Account.
  • Login to your “YouTube” Account by visiting https://www.youtube.com/
  • Visit http://youtube.com/account_monetization
  • Enable “Monetization” for your YouTube Account. The screenshot for doing the same is given below:
21 How to get an Approved Adsense Account in 1 hour?
  • After that, You will have to “Accept” all terms and condition. The screenshot of the same is given below:
3 How to get an Approved Adsense Account in 1 hour?
  • Finally, Click on “Monetize” Button. The screenshot of the same is given below:
5 How to get an Approved Adsense Account in 1 hour?
  • After doing that, You will receive an EMail in your Inbox.
  • Now, Upload a Unique video in your YouTube Account. While doing that, Don’t forget to add appropriate description and Tags for videos. Wait for the upload to get completed. Once done, Publish it.
  • To associate an Adsense Account, Visit https://www.youtube.com/account_monetization and expand the topic “How Will I be Paid” and click on the link “Associate an Adsense Account“. The screenshot of the same is given below:
51 How to get an Approved Adsense Account in 1 hour?
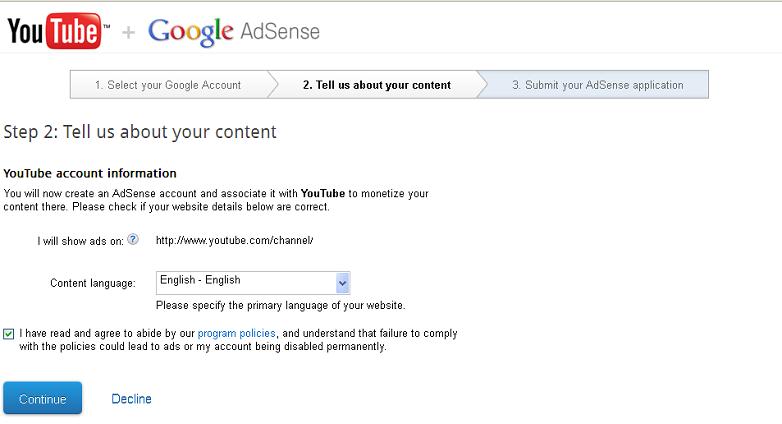
  • Now, You will be redirected to a screen, Where you will have to set up your Adsense Account. Click on “Continue” button for filling your other details such as Address, Country, Payee Name etc
apply for adsense 5 How to get an Approved Adsense Account in 1 hour?
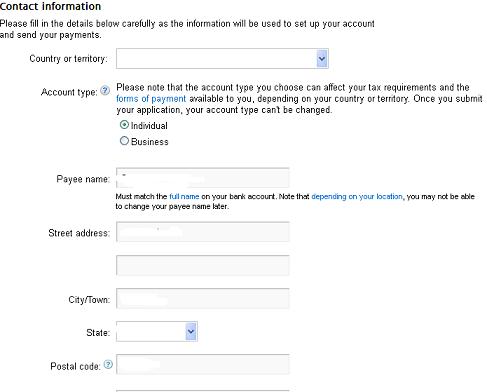
  • After clicking on “Continue” button, You will see the below given screen. Enter all details correctly.
fill adsense aplication form form 6 How to get an Approved Adsense Account in 1 hour?
  • After filling all details, Click on “Submit” button. Wait for 1-2 hours. You will get an EMail containing the details of  an Approved Adsense Account. Hurray….Hurray…enjoy.
Read more ...

Saturday 21 December 2013

How to upgrade adsense hosted account to normal account?

Google Is Strict Day By Day.The big one is Adsense Hosted Account..

What Is Adsense Hosted Account?
The account that you Get approved from hosted sites Like-Youtube,Hubpages etc.
Most of the people use tricks to aproove adsense account because google not approve there applications and they don't give adsense account.

Adsense Hosted Account: That which you can show ads only on Youtube,Hubpages,Blogspot (Sites which let you apply for Adsense and use ad codes on their domain)

Normal Account: That which you can show Ads on Sites/domain Your owned.


How-to-Upgrade-Adsense-Hosted-Account to Normal-Account


Now,Just see on this image.This is the difference between hosted and normal adsense account.
You want to Remove this(Hosted Acoount)Label to show ads on other sites/domains or whatever.

How to Upgrade Adsense Hosted Account to Normal Account

You can do so by filling a form , Google will manually review your application and website. They’ll upgrade your Adsense account to normal.

Few things to remember:

  • To upgrade Adsense hosted account to normal Adsense  account. You need a good  website. Google isn't  going to approve any spammy blog or the one with poor content.
  • We’ve wrote a complete detail article on tips before applying for Google Adsense account. Here are some quick important  tips you must follow before requesting Google to upgrade your Adsense hosted account to normal account.
  • Add important pages in your blog like: About us Page,  Privacy Policy Page, Contact Us Page.
  • You must be 18+. So Make sure to use the payee name same as on your bank account
  • Apply using a top level domain like .com , .net, .org
  • Write a good quality content and write a unique content to optimize it for search engines
  • Make your website fast loading.
  • Use good looking themes

Method to Upgrade your Adsense hosted Acoount to Normal account

Login  to your AdSense account.
On the Home tab, visit the Account settings page.
In the “Access and authorization” section, next to “Only host sites are allowed to show ads for your account,” click edit.


How-to-Upgrade-Adsense-Hosted-Account to Normal-Account


On the “Show ads on other websites” page that appears, enter the URL of the site where you plan to show ads.
Click on the Submit.

How-to-Upgrade-Adsense-Hosted-Account to Normal-Account

Now after submitting the forum, you have to add  adsense ads code in the blog you submitted in above steps.


Here is how to do.

  1. Sign in to your account. Visit the My ads tab.
  2. From the sidebar, choose  ”Content.”
  3. How-to-Upgrade-Adsense-Hosted-Account to Normal-Account
  4. Click +New ad unit.
  5. In the next step Name and customize your ads unit.
  6. See details about  settings.
  7. Click Save and get the ad code .
  8. Place that code in your blog that you submitted in the step mentioned above.
  9. Google will manually review your application forum. It can take some few days to week.
  10. You will get an email about approval or disapproval.  Even if your Application is rejected, don’t worry. You will be able to use that Adsense account on Hosted sites like Blogspot or Youtube.
If you HAVE ANY PROBLEM so comment below.
Read more ...

Time Sink is a new kind of activity tracking application with one goal in mind: to make it as easy as possible for you to track where the time goes when you're working on your Mac

Time Sink automatically tracks your activity across applications and windows.Reports let you see exactly where your time is being spent.
Time Sink is a new kind of activity tracking application with one goal in mind: to make it as easy as possible for you to track where the time goes when you're working on your Mac. Time Sink watches windows and programs, and lets you easily create pools to track related activities as one unit.

It's all about your time

Time Sink tracks the time you spend in the Mac programs—and their associated windows—as you use your Mac. It does this automatically, so you can go about your work without even thinking about Time Sink.
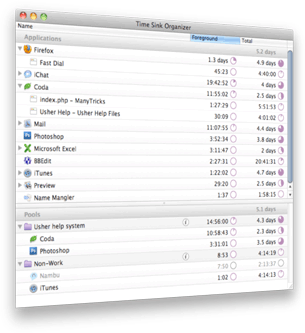
A table-style view (top left image above) shows usage for both foreground and total time, and can be easily sorted by name, foreground time, or total time.
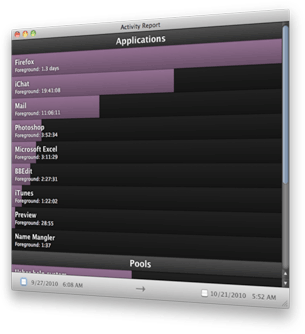
A report-style view takes that same information and presents it graphically, for an easy at-a-glance view of your activity.
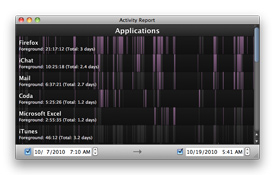
This report can be grouped by usage (as in this page's top right image), or showing natural foreground/background usage patterns over time, as in the below screenshot.
Foreground (purple) and background (gray) activity over time.
There's much more you can do with reports, though, as you'll soon see...

Pool your efforts

To help you track related activities, Time Sink uses Pools, which are simply collections of related windows. Creating a Pool is as simple as dragging and dropping a window (or application) from the Applications section of the Time Sink window to the Pools section.
Create pools to track related activities—it's as easy as drag-and-drop.
Windows can exist in more than one pool, and you can add informational notes to Pools, to help you remember their purpose.
You can also automatically group related windows together in a pool, just by using an asterisk to denote the variable portion of the window's name, as seen here:
Pools make it incredibly easy to group your activities in any way you wish.

Dock or menu bar—your choice

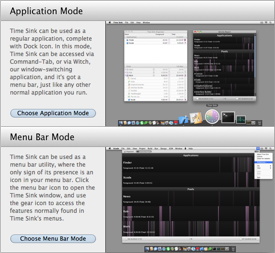
Time Sink can operate in two distinct modes: as a traditional Mac OS X application, complete with Dock icon, or as a menu-bar-only program. Which mode it uses is completely up to you.
On first launch, you'll be asked to choose between these two operating modes:
Choose your preferred mode on first launch—don't worry, you can change your mind later.
(Don't worry, this isn't a test—there is no right or wrong answer.) Choose the mode that works best for you…if you don't like your choice, you can always change modes via Time Sink's Preferences.

Reporting and exporting

Time Sink's reports are simple to use, yet powerful enough to help you track your activities over long periods of time. Here are just a few of Time Sink's reporting features:
  • View reports as activity over time, or summarized by foreground time (or total time).
  • Select report time periods by entering actual values, or simply dragging on the Reports window.
  • Set the sort order for the Reports window by changing the sort order in the main Time Sink window.
  • Auto-export usage reports every day.
  • Show only currently-tracked applications in reports, or show all applications for which Time Sink has data.
  • Exporting a report is as simple as pressing a keyboard shortcut.
  • Specify which fields you'd like included in exported reports.
Exported reports can be opened in Excel, FileMaker Pro, or any other program that can read delimited text files.

Set and forget…if you want to

Despite all its features and tracking abilities, Time Sink is incredibly easy to use: just launch it, and forget it.
Out of the box, Time Sink automatically tracks the time you spend in all your programs (and windows within those programs), and creates reports showing your usage of those programs (and windows)…all without you having to do anything other than launch the program.
As far as getting started, that's all there is to it. Without any further work on your part, Time Sink will begin tracking your activity, recording your running programs and associated windows.
So don't let Time Sink's powerful abilities fool you: it is incredibly easy to get up and running with Time Sink.

But wait, there's more!

As you might expect of a Many Tricks program, Time Sink has a few more abilities up its sleeves.
  • Prevent tracking of specified applications and windows by adding them to a blacklist.
  • Automatic suspension of usage tracking after a specified idle interval.
  • Add new windows to existing pools, and drag windows between pools as you wish.
  • Show or hide inactive items and inactive pools.
  • Optional auto-reset of application and pool timers each day.
  • Choose between colored or black-and-white menu bar icons.
As you can tell, a lot of thought went into making Time Sink both easy to use and powerful enough to get the job done.
Read more ...